はじめに
Rustが気になっている今日このごろ。
最近Rustの基本的なことをやった
+実践Rustプログラミング入門のWebアプリケーションの開発辺りまで読み終えたので、今回はActixWebを触ってみる。
公式のチュートリアルを進めつつ、Angularで作ったページを表示できるようにしてみる。
TL;DR.
フロントの準備
後でやるとフォルダ構成がしんどい気がしたので先に作っておく。
今回使ったFWはAngularなので、cliでサクッと作る。
$ npx @angular/cli new actix-web-sample
> カスタマイズはお好みで
ActixWeb準備
cargo newでプロジェクト作るところからスタート。
$ cargo new server
$ cd server
# cargo-editを導入しているので、cargo addで追加
# 追加していないならCargo.tomlに手動追加でOK
$ cargo add actix-web actix-rt
執筆当時のCargo.tomlのdependenciesはこんな感じ。
[dependencies]
actix-rt = "1.1.1"
actix-web = "3.1.0"
起動して何かしら返せるとこまで実装
公式のチュートリアルを参考にしながら、何かしら返せるとこまで実装する。
use actix_web::{get, web, App, HttpResponse, HttpServer, Responder};
// こう書くことで、`/`にGetのリクエストが来たときのハンドリングができる
#[get("/")]
async fn greet() -> impl Responder {
// ステータス200(OK)で、bodyに`Hello world!`を入れて返す
HttpResponse::Ok().body("Hello world!")
}
// `#[get(...)]`を指定しないと使うときに指定するときもできる
async fn manual_greet() -> impl Responder {
HttpResponse::Ok().body("Hey! Hey!! Hey!!!")
}
#[actix_web::main]
async fn main() -> std::io::Result<()> {
HttpServer::new(|| {
App::new()
// マクロでroutingを指定した関数はserviceに渡せばOK
.service(greet)
// routingを指定していない関数には、ここで指定することができる
// ↓であれば、`/hey`にgetのリクエストが来たとき
.route("/hey", web::get().to(manual_greet))
})
// ローカルホストのport8080で起動
.bind("127.0.0.1:8080")?
.run()
.await
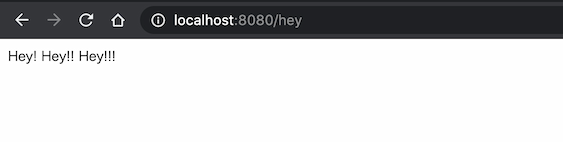
}アクセスして確認してみる。
ブラウザで試しても同じだがサクッとcurlで確認。
$ curl localhost:8080/
> Hello world!

$ curl localhost:8080/hey
> Hey! Hey!! Hey!!!
静的ファイルを返せるようにする
今回はrustのビルド結果があるtargetディレクトリ内にpublicディレクトリを作り、その中にあるindex.htmlを返すようにする。
静的ファイルを返すように別のcrateを追加する。
# actix-filesを追加
# 執筆当時のバージョンは"0.4.0"だった
$ cargo add actix-files
サーバー側の変更
追加が終わったら、先程作ったコードを変更していく。
変更内容は公式チュートリアルのこの辺を参考にする。
(特にChanging the default Not Found responseあたり)
use actix_files;
use actix_web::{web, App, HttpResponse, HttpServer, Responder, Result};

async fn index() -> Result<actix_files::NamedFile> {
  Ok(actix_files::NamedFile::open("target/public/index.html")?)
}

// `#[get(...)]`を指定しないと使うときに指定するときもできる
async fn manual_greet() -> impl Responder {
  HttpResponse::Ok().body("Hey! Hey!! Hey!!!")
}

#[actix_web::main]
async fn main() -> std::io::Result<()> {
  HttpServer::new(|| {
    App::new()
            // ルートにアクセスされたときは`index.html`を返す
            .route("/", web::get().to(index))
            // routingを指定していない関数には、ここで指定することができる
            // ↓であれば、`/hey`にgetのリクエストが来たとき
            .route("/hey", web::get().to(manual_greet))
            // 上記までにマッチしなければ、フォルダに飛ばす
            .service(actix_files::Files::new("", "target/public"))
            // どこにもマッチしなければ`index.html`を返す
            .default_service(
              web::route().to(index)
            )
  })
          .bind("127.0.0.1:8080")?
          .run()
          .await
}
クライアント側の変更
一旦、クライアント側はビルドの設定だけ変更する。
angular.json内の下記箇所を修正。
※書いていない箇所は生成時のまま。
{
  ...
  "projects": {
    "actix-web-sample": {
      ...
      "architect": {
        "build": {
          "builder": "@angular-devkit/build-angular:browser",
          "options": {
            "outputPath": "server/target/public",
            ...
          }
        }
      }
    }
  }
}変更したら一度ビルド(npm run build or ng build)して意図した通りの箇所に結果が出てくればOK。
動作確認
クライアントサイドの変更が終わったら、serverディレクトリに移動する。
cargo runで起動後↓のようなURLで問題なく表示できればOK。
localhost:8080/
localhost:8080/hey
Angularのルーティングを追加する
ここまででビルドしたクライアントアプリを返せるようにした。
これで終わっても良いのだが、もうちょっとAngular側を修正する。
実際にありそうなルーティングとAPIを通してデータを取ってくるというのを実装してみる。
まずはルーティングの追加をやる。
ページの追加
まずはクライアント側にページを追加する。
CLIでコンポーネント増やすところからスタート。
$ npm run ng g component first-page
$ npm run ng g component second-page
routingを設定
angular-routing.module.tsを修正する。
修正内容はroutingを指定しただけ。
import {SecondPageComponent} from './second-page/second-page.component';
import {FirstPageComponent} from './first-page/first-page.component';
import {NgModule} from '@angular/core';
import {Routes, RouterModule} from '@angular/router';

const routes: Routes = [
  {path: '', component: FirstPageComponent},
  {path: 'second', component: SecondPageComponent}
];

@NgModule({
  imports: [RouterModule.forRoot(routes)],
  exports: [RouterModule]
})
export class AppRoutingModule {
}
生成したコンポーネントもちょっと修正
外ページへのリンクを追加する。
first-page / second-page共に修正するが、内容が同じなのでfirst-pageの方だけ記載。
<h1>first-page works!</h1>
<ul>
  <li>
    <a routerLink="/">First Page</a>
  </li>
  <li>
    <a routerLink="/second">Second Page</a>
  </li>
</ul>app-component.htmlにチュートリアルの項目があるが、いらないので大幅カットする。
<!-- router-outletだけ残し全消し -->
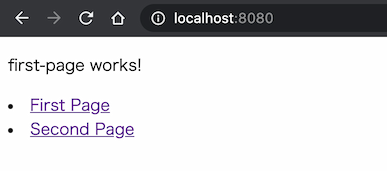
<router-outlet></router-outlet>ここまで修正したら実際に動かしている。
# アプリのビルド
$ npm run build
# serverディレクトリに移動
# →移動先は適宜読み替え
$ cd server
# サーバ起動
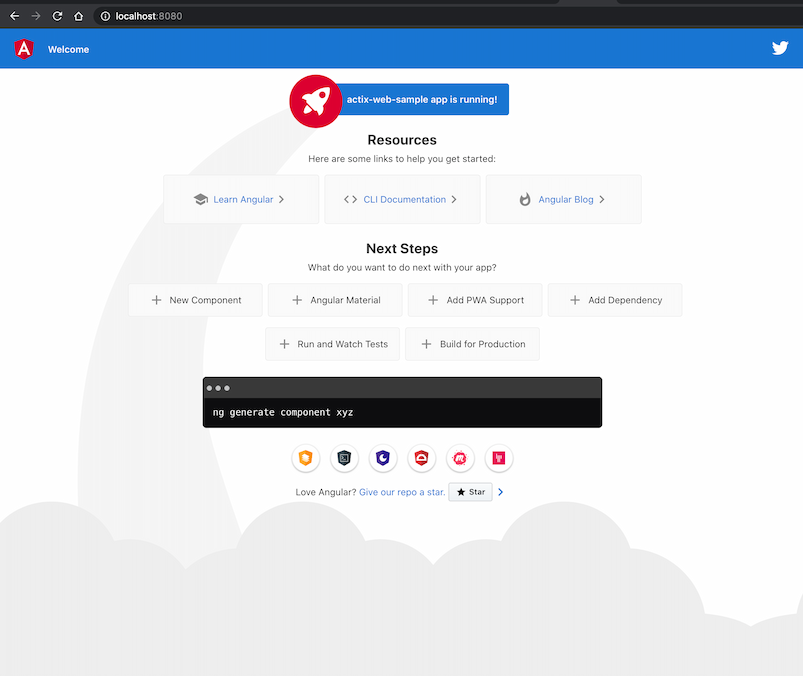
$ cargo run画像のようなページが表示されればOK。
APIからデータを取れるようにする
ルーティングは問題なくできたので、次はAPIからデータを取って画面に表示できるようにする。
まずはサーバサイド(Rustの方)の修正から。
クレートの追加
JSON周りを扱いやすくするようにクレートを追加する。
使うクレートについてはserdeとserde_json。
$ cargo add serde
$ cargo add serde_json
それぞれのバージョンは下記の通り。
[dependencies]
serde = "1.0.116"
serde_json = "1.0.59"
コード修正
クレートが追加できたら、実際にコードを修正していく。
今回はAPIを2つ作り、1つは文字列リスト、もう1つはjsで言うところのobjectを返すようにする。
リストを返却できるように
コードはひとまず変更あるところだけ記載。
最後に全量を記載するので通しで見たい場合はそちらを参照。
async fn first() -> impl Responder {
  // 文字列のリストを作成
  let first_data: Vec<String> = vec!["hoge".to_owned(), "huga".to_owned(), "piyo".to_owned()];
  // リストから文字列へ変換
  let first_data_response = serde_json::to_string(&first_data).unwrap();
  // `ContentType: application/json`で返却
  HttpResponse::Ok()
          .content_type("application/json")
          .body(first_data_response)
}

#[actix_web::main]
async fn main() -> std::io::Result<()> {
  HttpServer::new(|| {
    App::new()
            .route("/", web::get().to(index))
            .service(
              // scopeを指定することで以降指定するrouteは`/api`が先頭についているのと同義になる
              web::scope("/api")
                      // ここは`/api/first`にリクエストが来たとき
                      .route("/first", web::get().to(first))
            )
            .service(actix_files::Files::new("", "target/public"))
            .default_service(web::route().to(index))
  })
          .bind("127.0.0.1:8080")?
          .run()
          .await
}
↓のように意図した通りに返ってくればOK。
$ cargo run
$ curl localhost:8080/api/first
> ["hoge","huga","piyo"]
objectを返せるようにする
次はjsで言うところのobjectを返せるようにする。
やりたいこととしては、構造体のデータを返せるようにする。
今回の修正を加えたサーバー側のコードの全量は下記の通り。
// 返したいデータ
// json文字列化したいため`#[derive(Serialize)]`をつける
// Serializeは返却する構造体全てにつける必要がある
// →`SecondDataResponse`にだけ付けてもエラーになる
#[derive(Serialize)]
struct SecondData {
  id: i32,
  name: String,
}

// レスポンス用のデータ
#[derive(Serialize)]
struct SecondDataResponse {
  // ↑で定義した構造体のリストを返却する
  list: Vec<SecondData>,
}

async fn second() -> impl Responder {
  // 返却用データを作成
  let data: Vec<SecondData> = vec![
    SecondData {
      id: 1,
      name: "hoge".to_owned(),
    },
    SecondData {
      id: 2,
      name: "huga".to_owned(),
    },
    SecondData {
      id: 3,
      name: "piyo".to_owned(),
    },
  ];
  // SecondDataResponseに合わせた上で文字列化
  let second_data_response = serde_json::to_string(&SecondDataResponse { list: data }).unwrap();

  HttpResponse::Ok()
          .content_type("application/json")
          .body(second_data_response)
}

async fn first() -> impl Responder {
  // 文字列のリストを作成
  let first_data: Vec<String> = vec!["hoge".to_owned(), "huga".to_owned(), "piyo".to_owned()];
  // リストから文字列へ変換
  let first_data_response = serde_json::to_string(&first_data).unwrap();
  // `ContentType: application/json`で返却
  HttpResponse::Ok()
          .content_type("application/json")
          .body(first_data_response)
}

#[actix_web::main]
async fn main() -> std::io::Result<()> {
  HttpServer::new(|| {
    App::new()
            .route("/", web::get().to(index))
            .service(
              web::scope("/api")
                      .route("/first", web::get().to(first))
                      // ここは`/api/second`にリクエストが来たとき
                      .route("/second", web::get().to(second)),
            )
            .service(actix_files::Files::new("", "target/public"))
            .default_service(web::route().to(index))
  })
          .bind("127.0.0.1:8080")?
          .run()
          .await
}
↓の通り返ってくればOK。
$ cargo run
$ curl localhost:8080/api/second
> {"list":[{"id":1,"name":"hoge"},{"id":2,"name":"huga"},{"id":3,"name":"piyo"}]}
クライアント側の修正
上で作ったAPIを叩けるようにクライアント側の修正をする。
まずはHttpClientを使えるようにするところまで。
HttpClientを使うServiceを作る。
$ npm run ng g service service/httphttp.service.tsではとりあえずgetを叩けるようにしておく。
import {HttpClient} from '@angular/common/http';
import {Injectable} from '@angular/core';
import {Observable} from 'rxjs';

@Injectable({
  providedIn: 'root'
})
export class HttpService {

  constructor(private readonly http: HttpClient) {
  }

  get<T>(url: string): Observable<T> {
    return this.http.get<T>(url);
  }
}これをapp.module.tsに追加する。
HttpClientModuleも忘れずに追加しておく。
import {HttpService} from './service/http.service';
import {HttpClientModule} from '@angular/common/http';
import {BrowserModule} from '@angular/platform-browser';
import {NgModule} from '@angular/core';

import {AppRoutingModule} from './app-routing.module';
import {AppComponent} from './app.component';
import {SecondPageComponent} from './second-page/second-page.component';
import {FirstPageComponent} from './first-page/first-page.component';

@NgModule({
  declarations: [
    AppComponent,
    SecondPageComponent,
    FirstPageComponent
  ],
  imports: [
    BrowserModule,
    AppRoutingModule,
    HttpClientModule
  ],
  providers: [HttpService],
  bootstrap: [AppComponent]
})
export class AppModule {
}これでリクエストは送れる様になったので、first-page.componentとsecond-page.componentを修正する。
まずはfirst-page.componentから。
修正内容としては、ts側にはAPI叩く処理を追加。html側ではデータを表示するように修正。
import {HttpService} from './../service/http.service';
import {Component, OnInit} from '@angular/core';

@Component({
  selector: 'app-first-page',
  templateUrl: './first-page.component.html',
  styleUrls: ['./first-page.component.scss']
})
export class FirstPageComponent implements OnInit {

  private _firstData$: string[] = [];

  constructor(private readonly httpService: HttpService) {
  }

  ngOnInit(): void {
    this.httpService.get<string[]>('/api/first').subscribe(
            res => this._firstData$ = res,
            err => console.error('err: ', err)
    );
  }

  get firstData() {
    return this._firstData$;
  }
}<h1>first-page works!</h1>
<ul>
<li>
<a routerLink="/">First Page</a>
</li>
<li>
<a routerLink="/second">Second Page</a>
</li>
</ul>
<ul>
<li *ngFor="let item of firstData">{{item}}</li>
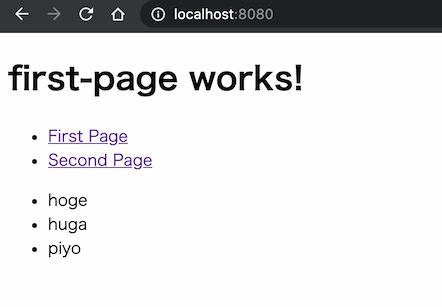
</ul>ビルド(npm run build)してサーバー起動(cargo run)後、
localhost:8080/first-pageにアクセスし画像の様に表示されればOK。
次に、second-pageの方を修正する。
大体first-pageと同じだが、データ形式が違う分をちょろっと修正。
import {Component, OnInit} from '@angular/core';
import {HttpService} from '../service/http.service';

type SecondData = {
  id: number;
  name: string;
}
type SecondDataResponse = {
  list: SecondData[];
}

@Component({
  selector: 'app-second-page',
  templateUrl: './second-page.component.html',
  styleUrls: ['./second-page.component.scss']
})
export class SecondPageComponent implements OnInit {
  private _secondDataList$: SecondData[] = [];

  constructor(private readonly httpService: HttpService) {
  }

  ngOnInit(): void {
    this.httpService.get<SecondDataResponse>('/api/second').subscribe(
            res => this._secondDataList$ = res.list,
            err => console.error('err: ', err)
    );
  }

  get secondDataList(): SecondData[] {
    return this._secondDataList$;
  }
}<h1>second-page works!</h1>
<ul>
<li>
<a routerLink="/">First Page</a>
</li>
<li>
<a routerLink="/second">Second Page</a>
</li>
</ul>
<ul>
<li *ngFor="let item of secondDataList">id: {{item.id}} / name: {{item.name}}</li>
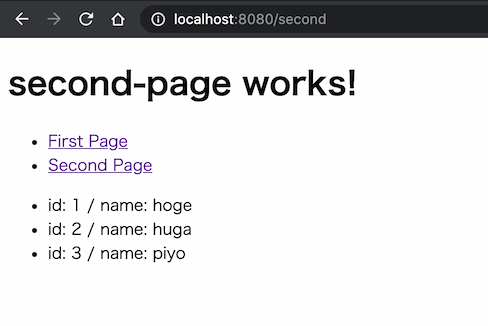
</ul>first-pageの時と同じくsecond-pageにアクセスし、画像のように表示されればOK。
まとめ
今回はActixWeb + Angularを試してみた。
一般的にはバックエンドもjs(node)でやることが多いと思う。
Rustでやった場合の個人的なメリット、デメリットは↓の通り。
メリット
- サーバーの起動が早い(気がする)
- Rustの安心感
- ちゃんと静的な型がある + 怪しい実装はそもそもコンパイルが通らない
デメリット
- そもそも言語2つ使うのが難しい
- 環境設定が手間
- tsで書いてもめんどくさい気がしなくも無いけど
自分としてはRust書くのがちょっと楽しかったのでもう少し試して見ようと思った。
ただ、やっぱりtsのみの方が楽な気もする。
参考リンク

